UPS Monitoring with NUT + Net-SNMP
2020-05-22: After recently re-following these guidelines myself, a few changes have been made in how we start the UPS driver
Early last year a friend and I started a local, wireless mesh network that eventually evolved into a community-run WISP. The full story of how it came to be is for another post...
Fast forward many months and we secured some tower space for our radios and some limited rack space for our main networking equipment and servers. The location was just about perfect, but rather inconvenient to service.
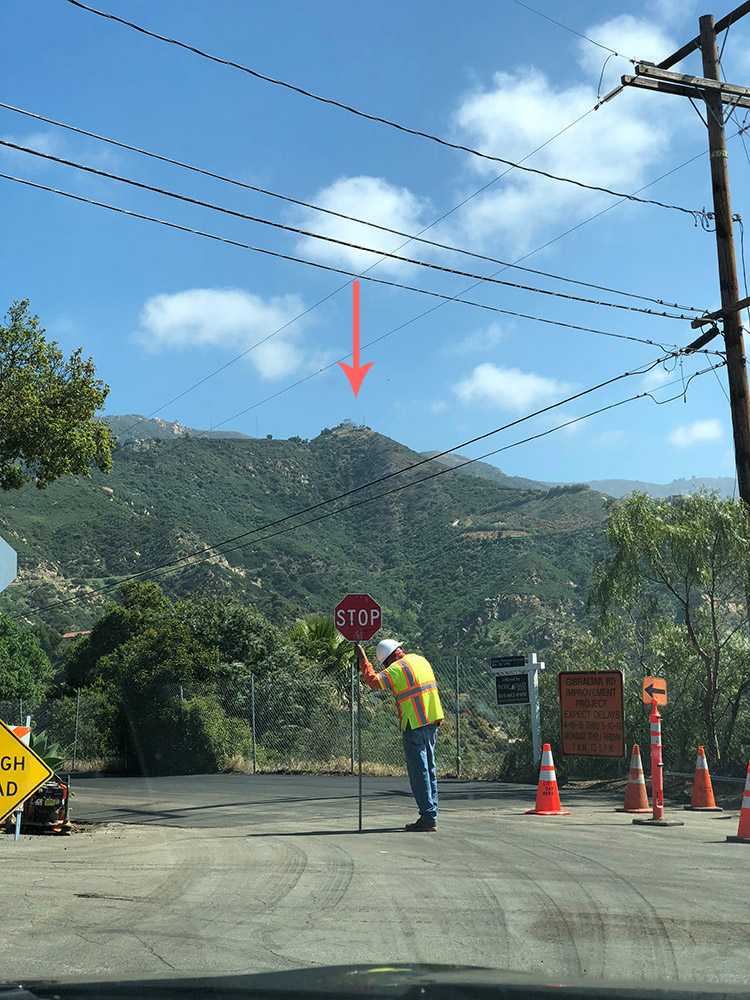 Definition of not accessible
Needing some reliable—but cheap—backup power for our main router, switch, and small 1U server we settled on the 10-outlet CyberPower 850VA/510W UPS (CP850PFCLCD). It provides reliable, stable output and will run our equipment (and radio) for about 45 minutes in the event the mountain site loses power.
When I drove up to connect it to our equipment I plugged in the supplied USB Type-B to Type-A cable from the UPS to an empty port on our server—not yet knowing how to query the UPS, or if there was any linux tooling available for our particular device.
Below are the steps I took to enable quantifiable monitoring of my consumer-grade UPS via open-source tooling on CentOS 7. And, in the footer I've linked two sources that helped me succeed in this project.
Install + configure NUT on CentOS 7
Throughout this guide I'm using CentOS, but NUT should be available on most distros/package managers.
Enable EPEL repository and install NUT
Configure NUT driver
If you're not using the same UPS, check the NUT hardware compatibility list to see if your equipment is supported by the drivers included with NUT.
First, run the command below to detect any supported UPS devices, and determine which driver is being used.
Output wil be similar to:
[nutdev1]
"usbhid-ups"
"auto"
"0764"
"0501"
"CP850PFCLCD"
"000000000000"
"CPS"
"001"
Next, let's configure NUT:
Append these lines:
[cyberpower]
usbhid-ups
auto
"CyberPower 850"
Change [cyberpower] to any name you'd like. This value becomes the query name for polling the device. Additionally, driver should reference the output of nut-scanner and desc is entirely optional.
Let's start the UPS driver:
If you receive any error ensure you have sudo privileges—and try restarting the machine if the problem persists.
We should also set NUT's mode to standalone.
MODE=standalone
From their documentation:
standalone: This mode address a local only configuration, with 1 UPS protecting the local system. This implies to start the 3 NUT layer (driver, upsd and upsmon) and the matching configuration files. This mode can also address UPS redundancy.
Configure NUT server and monitor
Once the driver is up and running, we need to set up the user for accessing the NUT daemon.
Append:
[local_mon]
<secretpass>
master
Change <secretpass> to a secure password of your choosing.
Lastly, we'll edit the NUT monitor configuration with the name of our device, and the access information for the newly created user.
And append:
MONITOR cyberpower@localhost 1 local_mon <secretpass> master
Of course, change cyberpower to the name you gave your device, and <secretpass> to the password you specified in /etc/ups/upsd.users
Enable services
To ensure monitoring ability after planned and unplanned reboots, we need to enable and start the NUT system services.
If you encounter any errors starting the services, restarting may resolve these. Often, running upsdrvctl start as we did earlier hijacks USB communication with the UPS and causes an error when trying to start NUT services.
Test UPS querying!
Run (replacing cyberpower with your device name):
And, if all configurations are happy you will see some data returned:
Install Net-SNMP
Create the script for MIB formatting of the query data: Note: this script formats MIBs specifically for LibreNMS.
Past the following, making sure to change UPS_NAME to your device name:
#!/usr/bin/env bash
UPS_NAME='cyberpower'
PATH=:/usr/bin:/bin
TMP=
for
do
OUT=
if [; then
else
fi
done
Make the script executable:
Now let's extend this script to the SNMP daemon:
Append the following and change <community> to your community name:
rocommunity <community>
extend ups-nut /etc/snmp/ups-nut.sh
Let's enable and start the SNMP daemon:
And finally, make a test query from a another host that can reach the server:
You should see results similar to this:
Yeah!!
Your host can now receive an SNMP query, poll your device with NUT, and respond with MIBs formatted for display/graphing on LibreNMS, Observium, or other SNMP-based monitoring platforms.
You could also skip SNMP entirely and use a bash or python script to automate the retrieval of the UPS values via the upsc command.
I hope this helps anyone looking to quantify and monitor the health of their UPS from afar.
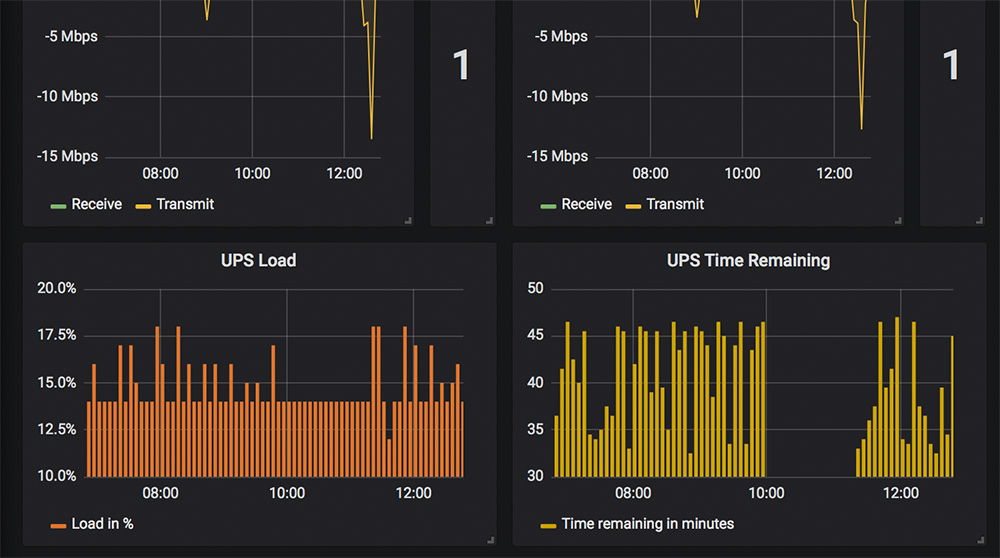
How I display my data
I use both LibreNMS and Grafana (via LibreNMS + InfluxDB) to display information about my UPS.
LibreNMS
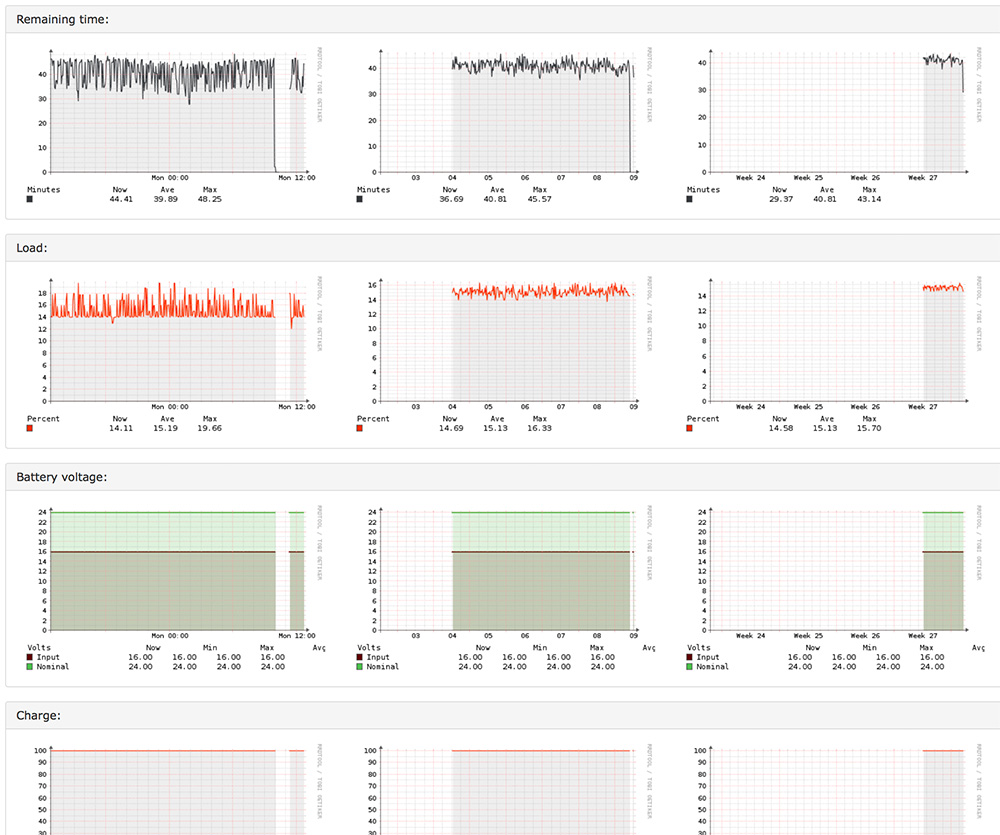
Grafana